How to Make Sure Your Website Content is Indexable
Make it easy for Google to crawl your website to ensure efficient crawling and faster indexing.
If the Googlebot cannot index your website, your URLs will not appear in the SERPs – meaning that visitors will not be able to access your website via Google. Making sure your website is indexable is therefore an important factor in increasing traffic and thus the overall performance of your website.
To make it more likely that the pages of your website are indexed, you should make it as easy as possible for the Googlebot to crawl your website. In this article, we will show you how to create and submit an XML sitemap in the Google Search Console, clean up your website by removing 404 errors and orphaned pages, and how to monitor your indexed pages. This will ensure that Google can crawl your site easily, making your website content indexable.
Make Your Website Acccessible to Make it Indexable
If you compare the internet to a large map, with a domain being a house, the individual web pages of this domain are comparable to rooms or floors of this house. The Googlebot is like a visitor to your house – the house should be easy to find and easily accessible. The better your website is structured, the easier it is for that visitor to browse your site for content and save the data for a later visit. That is one of the main tasks of the Googlebot – to follow and save URLs.
When the Googlebot comes to your website, it will firstly be directed to the robots.txt. The robots.txt file contains instructions regarding which pages should be crawled, and it is stored on the website (for example www.mypage.en/robots.txt). The instructions in the robots.txt convey to the crawler what pages should be crawled and indexed.
How to Create and Submit an XML Sitemap
The XML-sitemap is a list of all of the URLs of your website. The URL to your XML-sitemap should be stored in the robots.txt file, and you can submit it to the Google Search Console, so that Google knows the structure of your website.
To make your sitemap machine-readable, it must contain the following elements:
:format(avif))
Figure 1: Mandatory tags for an XML Sitemap
The sitemap can also contain these additional tags.
You can specify when the sitemap was last modified in the format YYYY-MM-DDThh:mmTZD.
This gives the Googlebot an indication of how often it can expect the sitemap to be altered. Possible values are: always (the website will be changed every time it is accessed), hourly, daily, weekly, monthly, annually, never (suitable for archived URLs). This tag should only be used if it can be assigned correctly to a URL. It is intended to show the crawler that they should visit the page frequently, as the content is regularly updated. It wouldn’t make sense to use the tag “changefreq always” for all URLs of your website.
With this tag, you can prioritize the crawling of your URL. 1.0 is the highest; 0.1 is the lowest.
Important: The use of these tags do not affect the ranking of your website – they simply help the Googlebot crawl your website efficiently.
So much for theory. Now let’s put it into practice: creating the sitemap.
For most websites, creating this file manually would be a very long process. There are therefore many tools that do the work for you, some of which are listed here:
Some CMS also have a function helping you to create an XML sitemap with just one click.
What to Watch Out for when Creating Your Sitemap
When creating your sitemap, you should make sure that it can be read correctly by the Googlebot, and that there are no errors. You can be fairly sure that a regular sitemap generators or your CMS will generate an error-free sitemap, but you should still check the following aspects of your file once completed.
Your checklist:
The coding of the sitemap must always be in UTF-8 format.
Special characters in URLs must be converted to escape codes. For example, the URL www.mypage.com/büro is listed on the sitemap as www.mypage.com/b%FCro.
The URLs must have a uniform syntax. If your site is accessible mainly via http://www.mypage.com, sub-pages should not be listed on the sitemap as http://mypage.com or https://www.mypage.com.
The URLs listed in the sitemap should not contain any session IDs. These IDs are usually added to the URL to assign users to it during their visit.
If your site is available in multiple languages, this should be noted in the sitemap as a hreflang tag.
</ ul>
Example:
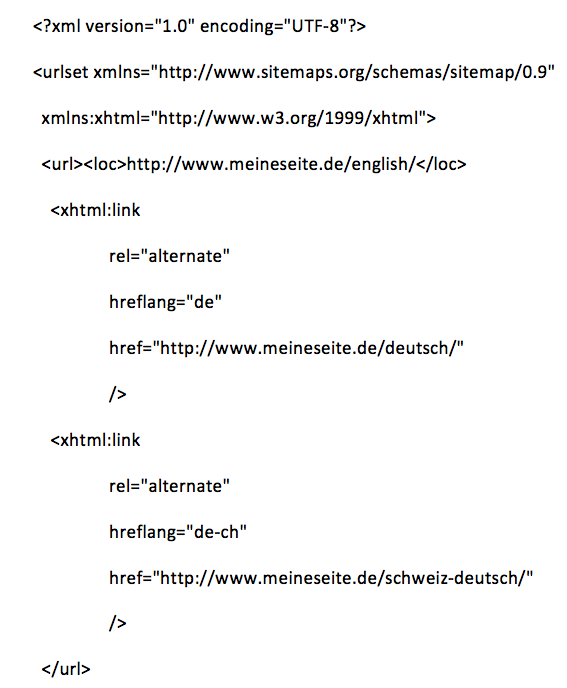
Figure 2: XML sitemap example
You now have the basics for creating a sitemap. However, you should also be aware of the different forms of sitemap.
Special Cases: Videos, Images, or News
As well as listing the URLs of the subpages of your website, you can also list references to videos, images, or news in an XML sitemap. It is important to flag the content types within the tags in each sitemap.
:format(avif))
Figure 3: Special cases
If your website has many images, we recommend creating an images sitemap. The same applies to videos. A separate sitemap for news is only important if you want your website to appear in Google News. To be accepted into the Google News program, you have to meet certain conditions that you can find here.
Splitting Sitemaps for Large Websites
If you want your sitemap to list a large number of URLs, it is advisable to divide them up into several smaller sitemaps. As a general rule, a sitemap should be less than 50 megabytes and should not contain more than 50,000 URLs.
If you create multiple sitemaps, you should also create a sitemap index file that you submit to the Googlebot. For example, if you have 3 sitemaps, such a file would look like this:
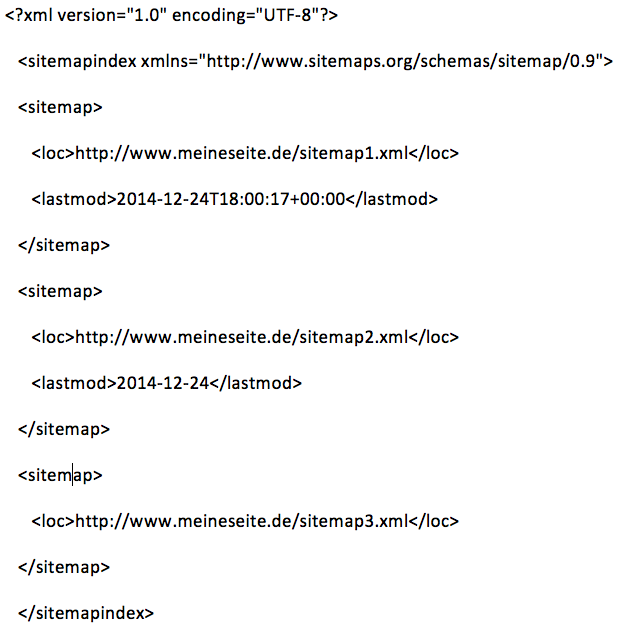
Figure 4: Sitemap index file for multiple sitemaps
It is important in this case to provide the central file with the aligncenter. In addition, you must specify with the tag where each sitemap is stored. You can also indicate when the sitemap files were changed last.
Submit Your Sitemap To the Google Search Console
The next step is to submit your sitemap to the Google Search Console.
First, save your sitemap or sitemaps and index file on your server so that the files can be accessed via a fixed URL. Copy this URL.
Log into the Google Search Console.
If you have not used a sitemap before, click on “No sitemaps” in the right pane of the Search Console dashboard.
If you want to test your sitemap for errors before submitting it, click “Test sitemap.” You will receive an evaluation of the file with information on possible errors, without the file being passed to the Googlebot.
Important: Save the sitemap URL in your robots.txt file, so that the Googlebot can access it before crawling your site
It is important that your sitemap is always up to date. Therefore, you should update the XML file whenever URLs change, or when new URLs are added. A sitemap gives Google an overview of the structure of your website, so it knows which pages to crawl, making your website content more easily indexable.
Update Your Content: Regular cleanups
If you show the Googlebot your URLs via the sitemap, you should also ensure that the content of the URLs is always up to date and available, because if the Googlebot frequently encounters 404 error pages, it may no longer index your subpages. There’s also a risk that orphaned pages may not be found by the bot, and will therefore not be indexed.
Finding 404 pages
When a user clicks a URL to get to a page of your website that no longer exists, your server will issue a 404 status code (not found). This is firstly annoying for visitors, and means that the Googlebot wastes resources by trying to visit these pages. Ryte’s software can help in eliminating 404 errors: in the module Website Success, click on “indexability”, “status codes” to see your 404 errors.
:format(avif))
**Figure 5:**Find 404 errors with Ryte
You can find all 404 errors with the Google Search Console under section “Crawl” by clicking “Crawl errors.”
:format(avif))
Figure 6: Find 404 errors with the Google Search Console
If the contents of the “old” URL are accessible on a “new” URL, you can easily redirect the old URL to the new URL, using 301-redirect. Theoretically, you can do this step also when you redirect to similar content on your domain. If you cannot redirect the URLs, you should make an 404 error page, giving users the option to continue searching on your website or providing them with recommendations on related topics. Find out more information regarding the importance of creating 404 error pages for your users in this article.
Orphan pages
Orphan pages can interrupt the Googlebot’s crawling of your website because these pages are not accessible through incoming links, and are not connected with the rest of your website with internal links.
To find orphaned pages, you have to make up a list of all URLs of your website and compare it with the URLs that were actually crawled. The web pages that were not crawled are thus orphan pages. One possible cause of orphan pages is incorrect internal linking, which you should correct. If you find orphaned pages that either have no or incorrect content, delete them.
After troubleshooting 404 errors and removing orphaned pages you should update your XML sitemap so that only error-free content will be passed on to the Google bot.
Permanent Monitoring of Indexable Pages
It is important to permanently monitor the indexing of your website so that you can quickly react to errors and prevent your website losing valuable rankings or traffic.
You can use the Google Search Console to monitor the status of your indexed pages.On the left hand menu in the Google Search Console, click on the item “Google index” and then “Index status” to get an overview of Google’s indexing of your website.
:format(avif))
:format(avif))
Figure 7: Indexing status
If you find that the number of your indexed pages is rapidly decreasing even though you are constantly providing new content, you should find out why. As Google doesn’t guarantee that the URLs submitted via the sitemap will be indexed, you should keep an eye on the ratio of submitted pages versus indexed pages. If the number of submitted URLs is significantly higher than the actually indexed URLs, there may be errors on your pages that prevent Google from indexing them.
Log into the Search Console and click on “sitemaps”. Here, you can see how many of your submitted pages were actually indexed.
:format(avif))
Figure 8: Overview of indexed pages compared to submitted sitemaps
If you see that the number of pages submitted is significantly higher than those indexed, the following points will assist you in troubleshooting:
Check your robots.txt file. Are important website areas excluded?
Check if you are using the noindex tag correctly. Are you mistakenly excluding subpages of your website?
Check the correct use of canonical tags. Do your canonical tags direct to the correct pages? Are you using the same syntax?
The indexability report from Ryte will also give you an overview of your indexable pages, showing for example how many are blocked by robots.txt. In this article, you can find out in more detail how Ryte’s indexability report will help you check if your website content is indexable.
:format(avif))
Figure 9: Indexability Report in Ryte
You can also sporadically do a site search through the Google search to see if individual pages of your site are in the index. Enter the following in the search box site:www.mywebsite.com/subpage. After clicking “Search”, your site will be displayed with a snippet in the SERPs if it is indexed.
It is important to regularly check the indexing status of your website after making changes or adding new URLs. Regardless of major changes to the website, you should create a plan for monitoring your indexable pages, using the Google Search Console and tools such as Ryte.
Conclusion
You should now be familiar with how creating and submitting a sitemap can help Google crawl and index your website content, and the importance of regular clean-ups and permanent monitoring for making your website content indexable. Bear in mind that these measures give no guarantee of good rankings – you still have to create great content for your users. However, if your website content is not indexable, users will not even be able to see your website content. Therefore, making sure that your website content is indexable creates the basis for a successful website.
Check your indexable pages with Ryte for FREE
Ryte users gain +93% clicks after 1 year. Learn how!
Published on Jan 4, 2018 by Olivia Willson
:format(avif))
:format(avif))
:format(avif))
:format(avif) "How to Improve Your Mobile Conversion Rates")